serhii.net
In the middle of the desert you can say anything you want
-
Day 2531 (05 Dec 2025)
More label studio annotation templates notes
Resources
- Label Studio Enterprise — Data Labeling & Annotation Tool Interactive Demo
- I always look for it, it shows things like scrollable fields, columns, the building blocks basically. Especially the advanced config templates.
Template bits
Adding sample data to template
(Shown somewhere in examples d but I always have to look for it)
<Header value="xxx" />

<!-- {
"data": {
  "index": 4,
  }
} -->
Since spaces don’t matter, this is even better for copypasting new versions:
<Header value="xxx" />

<!-- { "data":

{
  "index": 4,
}

} -->
toName
Applying stuff to multiple names: comma-separate them1 EDIT: this doesn’t result in an error but quietly drops annotations and makes them not-editable, TODO bug report!<Header value="Which text is better?" size="6" /> <Choices ... toName="name_a,name_b">Choices
-
Choices by radio button instead of checkmarks for single choice: `
- TL;DR always use this, I hate that the checkmark design language is going away
-
Inline choices:
layout="inline" -
Value is shown in the screen, alias can override that in json output:
<Choice alias="1" value="Completely mismatched tone/content"/>will be1in json `
Formatting
Formatting text with info — couldn’t find anything better than this abomination:
<View style="display: flex;">
	<Header value="How well is this advertisement tailored for group '" size="6" />
	<Header value="$target_group" size="6" />
	<Header value="'?" size="6" />
</View>
Or:

  <View style="display: flex;">
    <Text name="l_obj_id" value="Object ID:" /> <Text name="t_object_id" value="$object_id"/>
    <Text name="l_target_group" value="| Target group:" />  <Text name="t_target_group" value="$target_group"/>
	<Text name="l_style" value="| Style:" /> <Text name="sty" value="$text_style"/>
  </View>
Style/layout
Styling tables
The
<Table>tag generates a table with headers based on dict with key/value pairs.This compresses it:
  <Style>
    .ant-table-cell {
    	padding: 0;
    	font-size: 0.75rem;
    	line-height: 1; /* Removes vertical space added by line height */
        }
	.ant-table-tbody td {
    	padding: 10px !important;
    }

	/* And this sets the column widths */
    .ant-table-thead th:first-child,
    .ant-table-tbody tr td:first-child {
    	width: 40%;
    }
    .ant-table-thead th:last-child,
    .ant-table-tbody tr td:last-child {
		width: 60%;
    }
  </Style>
Generating tables as HTML
The native tag has very few options for config, in most cases rolling our own is a good idea. This quick undocumented ugly function generates a label-studio-like table structure (except it’s missing missing
<thead>that I don’t need) from a key/value dictionary.def poi_to_html_table(poi: dict[str, str]) -> str: DIVS_OPEN = '<div class="ant-table ant-table-bordered"><div class="ant-table-container"> <div class="ant-table-content">' TABLE_OPEN = '<table style="table-layout: auto;">' TBODY_OPEN = '<tbody class="ant-table-tbody">' TR_OPEN = '<tr class="ant-table-row">' TD_OPEN = '<td class="ant-table-cell">' TABLE_DIVS_CLOSE = "</tbody></table></div></div></div>" res = f"{DIVS_OPEN}{TABLE_OPEN}{TBODY_OPEN}" for k, v in poi.items(): res += f"{TR_OPEN}{TD_OPEN}{k}</td>{TD_OPEN}{v}</td></tr>" res += TABLE_DIVS_CLOSE return resTO STYLE THEM, SEE BELOW
Styling HTML by including it
inline<HyperText name="poi_table" value="$poi_html" inline="true" />If you want to generate HTML and apply styles to it, the HyperText should be
inline, otherwise it’ll be an iframe. Above,$poi_htmlis a table that then gets styled to look like native tables through.ant-table-...classes, but the style lives in the template, not in$poi_html.Scrollable areas
Very very handy for texts of unknown length, especially inside columns:
<View style="height: 500px; overflow: auto;"> <Text name="text" value="$text" /> </View>EDIT:
max-heightfor multiple stacked windows is golden!Making scrollbars visible
Don’t ask how or why, but this works as of
1.21.0. I don’t know enough tailwind to say why does the approach from this fiddle with!importantfails. Or why does the background of the scrollbar gets set always on chrome, but only on hover for firefox..scroll { scrollbar-color: crimson blue !important; /* scrollbar, background */ scrollbar-width: auto !important; /* Use OS default instead of thin, only Chrome */ }Related: scrollbar-color - CSS | MDN, Scrollbar Styling with Tailwind and daisyUI - Scott Spence
Multi-column layouts
<View style="display: grid; grid-template: auto/1fr 1fr; column-gap: 1em">`(or)
<Style>
	.threecols {display: grid; grid-template: auto/1fr 1fr 1fr;}
	.twocols {display: grid; grid-template: auto/1fr 1fr;}
</Style>
Patterns

  <Choices name="xxxx"  choice="single-radio" toName="obj_desc_a" layout="inline">
    <View style="display: flex;">
      <Header size="6" value="Bad" />
      <Choice value="1" />
      <Choice value="2" />
      <Choice value="3" />
      <Choice value="4" />
      <Choice value="5" />
      <Header size="6" value="Good" />
     </View>
  </Choices>
(Preserving l/r width)
  	<View style="display: grid; grid-template: auto/300px 300px 300px; place-items: center;">
      <Header size="6" value="Bad" />
      <Rating name="444"  toName="obj_desc_a" maxRating="5" />
      <Header size="6" value="Good" />
	</View>
You can make the options short and place additional info in hints!
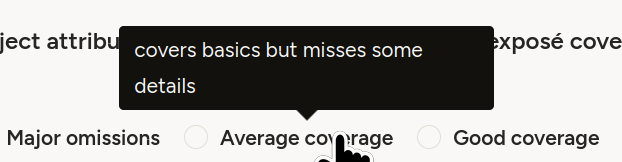
<Choice alias="3" value="Average coverage" hint="covers basics but misses some details"/>Misc
- Disabling template/layout hotkeys (the ones on the options):
- disable once in annotation settings, works across all projects
- Set explicitly to nothing
- For tab/indent formatting when in the template editor, ctrl-(backspace/delete) helps
CSS etc. links
-
Seen here: Label Studio — Pairwise Tag to Compare Objects ↩︎
- Label Studio Enterprise — Data Labeling & Annotation Tool Interactive Demo
-
Day 2526 (30 Nov 2025)
Rclone for syncing files to cloud storage
TIL, mentioned by HC&BB: Rclone “is a command-line program to manage files on cloud storage”.
S3, dropbox, onedrive, [next|own]cloud, sftp, synology, and ~70 more storage backends i’ve never heard about.
Previously-ish: 250121-1602 Kubernetes copying files with rsync and kubectl without ssh access
-
Day 2520 (24 Nov 2025)
Speedtest websites, incl fast.com
Previously: 231018-1924 Speedtest-cli and friends
TIL about:
- Fast.com (to netflix’s servers)
- speed.cloudflare.com with many details
I especially like fast.com, I’ll remember the URI forever.
-
Day 2506 (10 Nov 2025)
Setting up label-studio with a local directory
Refs:
- Adding a local folder as storage backend: Label Studio Documentation — Cloud and External Storage Integration
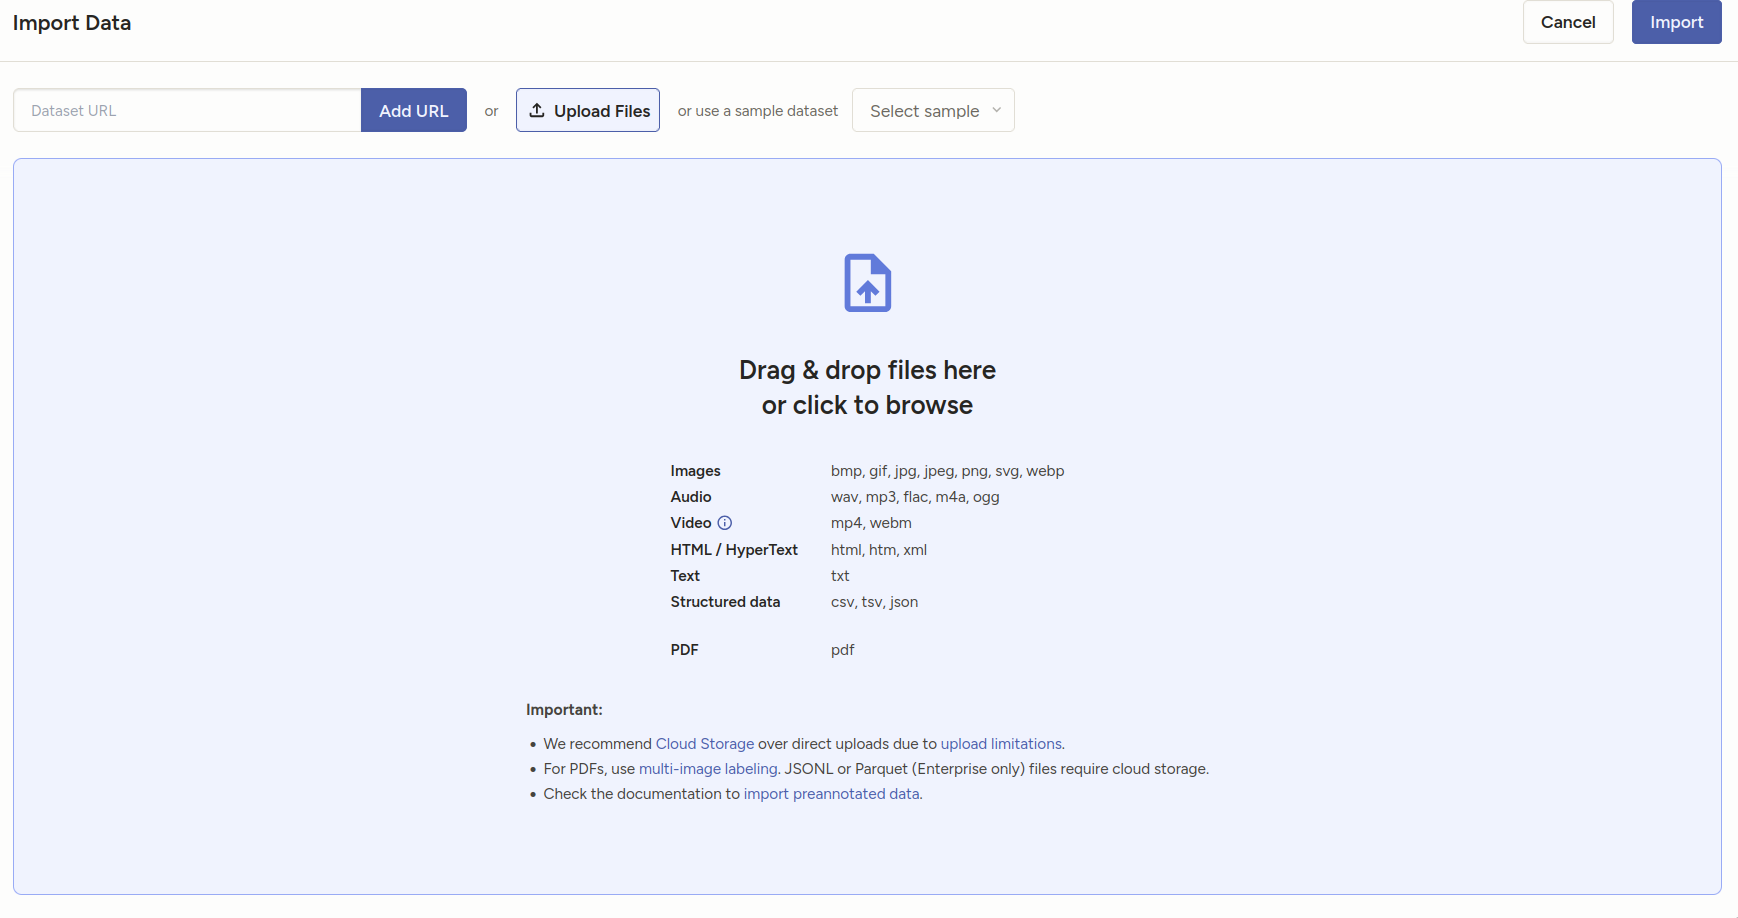
- Input .json tasks format: Label Studio Documentation — Import Data into Label Studio
The steps are:
- Create a local directory that will contain the files. Let’s assume
/home/sh/w/t/labelstudiodata - Create a subfolder there to keep your images, e.g.
pics, making the full path/home/sh/w/t/labelstudiodata/pics - Create your input data json.
[
  {
    "data": {
      "ref_id": 1,
      "image": "/data/local-files/?d=pics/cat1.png",
      "image2": "/data/local-files/?d=pics/cat2.png",
      "image3": "/data/local-files/?d=pics/cat3.png"
    }
  },
  {
    "data": {
      "ref_id": 2,
      "image": "/data/local-files/?d=pics/dhl1.png",
      "image2": "/data/local-files/?d=pics/dhl2.png",
      "image3": "/data/local-files/?d=pics/dhl3.png"
    }
  }
]
In the data, the paths are
/data/local-files/?d=pics/cat1.png— start with/data/local-files/?d=, then the subdir, then the path to the file itself (here it’s flat:cat3.jpg)- Start label-studio thus:
LABEL_STUDIO_LOCAL_FILES_SERVING_ENABLED=true LABEL_STUDIO_LOCAL_FILES_DOCUMENT_ROOT=/home/sh/w/t/labelstudiodata label-studioLABEL_STUDIO_LOCAL_FILES_DOCUMENT_ROOTshould point to your folder, WITHOUT the subfolder (nopics/) , and be absolute.- Add your directory as storage backend.
Create your project as usual, and open its settings. The absolute local path is the SUBFOLDER of the document root:
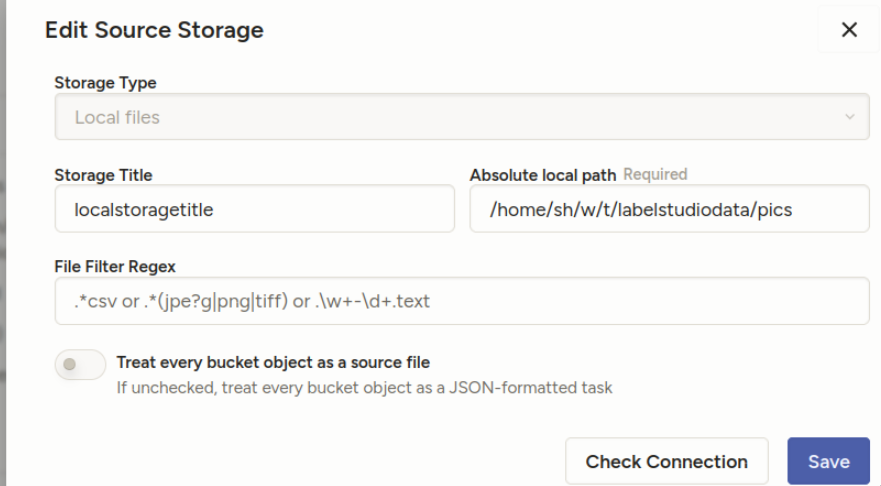
“Treat every bucket as source” should be unchecked — in the documentation, they describe it differently from the screenshots, but it’s equivalent:
- 8. Import method - select “Tasks” (because you will specify file references inside your JSON task definitions)
“Check connection” should tell you if everything’s OK.
- DON’T sync the storage. Import the json you created from project import.
You should see your tasks.
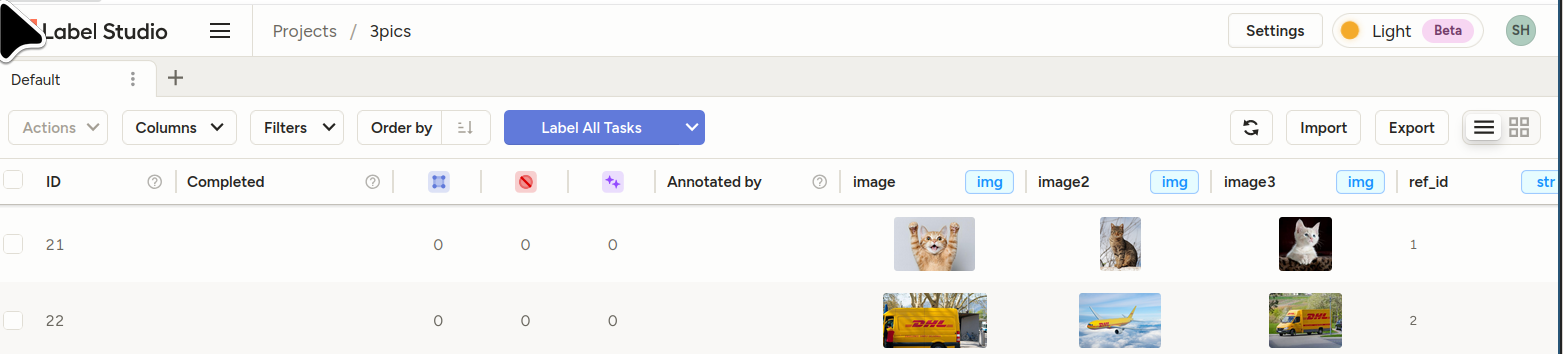
- Bonus sample template for the above: []
<View>  <View style="display: grid;  grid-template-columns: 1fr 1fr 1fr; max-height: 300px; width: 900px">  <Image name="image1" value="$image"/>
  <Image name="image2" value="$image2"/>
  <Image name="image3" value="$image3"/>  </View>
  <Choices name="choice2" toName="image2">
    <Choice value="Adult content"/>
    <Choice value="Weapons"/>
    <Choice value="Violence"/>
  </Choices>
</View>
-
Day 2480 (16 Oct 2025)
Nu shell
[Tried it, realized that it’ll replace 80% of my use-cases of jupyter / jq etc., and improve viewing of random csv/json files as well!
(Previously: 250902-1905 Jless as less for jq json data and csvlens)
- Parentheses are used for grouping:
$somelist | where ($it in (open somefile.json)) | length
Config in
~/.config/nushell/config.nu, editable byconfig nu, for now:$env.config.edit_mode = 'vi' $env.config.buffer_editor = "nvim" # `config nu` alias vim = nvim alias v = nvim alias g = git alias k = kubectl alias c = clear alias l = ls alias o = ^open[]
- Parentheses are used for grouping:
-
Day 2465 (01 Oct 2025)
OlmOCR for pdf-png-xxx to text
allenai/olmocr: Toolkit for linearizing PDFs for LLM datasets/training
Online demo: https://olmocr.allenai.org/
- can be exposed through eg vllm
- really cool results on messy docs
-
Day 2457 (23 Sep 2025)
OpenAI API notes
Tokenizing
curl -X 'POST' \
  'http://localhost:8001/tokenize' \
  -H 'accept: application/json' \
  -H 'Content-Type: application/json' \
  -d '{
  "model": "mistralai/Mistral-Small-24B-Instruct-2501",
  "prompt": "my prompt",
  "add_special_tokens": true,
  "additionalProp1": {}
}'
-
Day 2456 (22 Sep 2025)
jupyter notebook jupyterlab extensions with uv
Creating jupyterlab environments w/ uv
# Create a new uv environment
uv init --name bbk-presentation --bare
# Add ipykernel
uv add --dev ipykernel
# Install the kernel in jupyterlab
uv run ipython kernel install --user --env VIRTUAL_ENV $(pwd)/.venv --name=bbk-paper

# Add whatever you need to the environment
uv add pandas seaborn

# Support "%pip" magic **and installing extensions through jupyterlab UI!**
uv venv --seed

# Start jupyterlab
uv run --with jupyter jupyter lab
uv venv --seedis advertised in uv’s help, it seems also to work for installing extensions through the UI, though not sure how official/supported that is. But it works for me.Cool extensions as of 2026-02-12:
- jupyterlab-vim
- jupyter-ruff instead of black
Old notes, not sure how valid anymore
uv add jupyterlab-vim
uv run jupyter labextension list
uv run jupyter labextension enable jupyterlab_vim
uv run jupyter lab
-
Day 2450 (16 Sep 2025)
status of running copy move cp mv rsync operations with progress
apt install progress: Xfennec/progress: Linux tool to show progress for cp, mv, dd, … (formerly known as cv)progress -wgives status of running copy/mv operations- (for when you don’t
rsync -aP)
-
Day 2446 (12 Sep 2025)
Downloading stuff from HF hub through huggingface cli
 pip install -U "huggingface_hub[cli]"

 #either of
 hf auth login
 hf auth login --token $HF_TOKEN

 # models
 hf download adept/fuyu-8b --cache-dir ./path/to/cache
// TODO — vllm — will it be
VLLM_CACHE_ROOTorHF_HOME?Also: Troubleshooting - vLLM — they literally recommend getting it first via hf cli and passing the full path